React Security
Learn how security works in Webiny React applications.
- how security works in the context of a React application
The source of identity information for the React application is your Identity Provider (IdP). All modern IdPs offer React SDKs you can easily configure in your application to perform user signup, login, password recovery, etc. You can, of course, roll your own solution, but we recommend against it. Using SDKs of established IdPs will handle many things for you, like token refresh, password recovery, etc.
High Level Overview
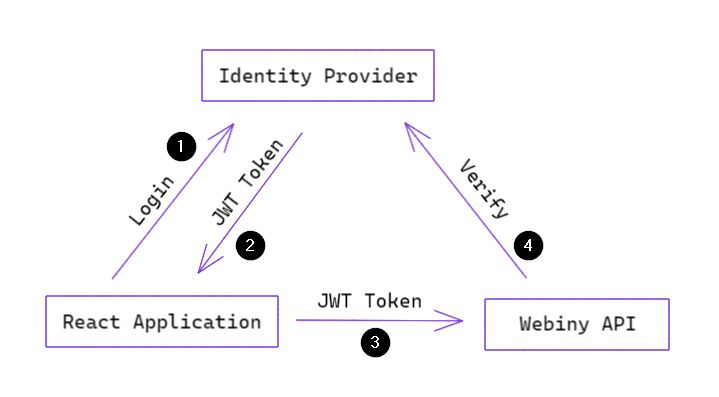
Let’s use the following diagram to analyze the order of operations that are going on once you start your React application that requires authentication:
 React Authentication and Authorization using Webiny Security Framework
Once your application has started, it will render a login form (this can be your custom form or the one provided by your IdP’s React SDK). A user submits their credentials to the IdP (1). If credentials are valid, IdP will return some basic identity information and a JSON Web Token (JWT) (2).
3). The Webiny API will then run the authentication process (4) described in the API Security article, and verify the JWT (remember, how you implement your authentication plugin is up to you).If the identity is valid and is authorized to perform the requested operation, the React application will receive the expected response from the API.
This is all there is to the application/API security on a high level. Let’s now look at how the identity and permissions we talked about in the previous article fit into the React application.
Application-Related Information
Once you’ve obtained the identity information from your IdP, you only know who has logged in. You still don’t know what he’s allowed to do, because your IdP doesn’t know about Webiny permissions, and you don’t have any application-related information (like profile picture, addresses, order history, etc.).
So how do we fetch all that information?
In the Admin Area application, that ships with the default Webiny project, we solve this problem by exposing a login GraphQL mutation. That mutation is responsible for returning user’s information based on the identity obtained in the authentication process (using the JWT). It’s not a traditional login API call where you specify a username and a password. It’s more of a helper that is used to provide application-related information and permissions back to the React application.
In your application you will implement your own GraphQL query or mutation to return the data that is relevant to you. What we have in Admin Area is specific to that particular application, and can’t be used in custom applications.
Managing Security State
Let’s assume that you’ve configured your IdP and you have your custom query to fetch user’s information for your React application. Now you need to share the identity and permissions with the rest of the application (to render user menu, avatar, show/hide parts of the UI depending on user’s permissions, etc.).
For these purposes, WSF (Webiny Security Framework) provides a SecurityProvider component which holds your identity information and allows other parts of the application to use it using a dedicated useSecurity() hook. Here’s a simplified React application to visualize the component hierarchy:
import { SecurityProvider } from "@webiny/app-security";
import { Authentication } from "your-idp-sdk";

export const App = ({ children }) => {
  return (
    <SecurityProvider>
      <Authentication>{children}</Authentication>
    </SecurityProvider>
  );
};
SecurityProvider component is a React Context 
interface SecurityContextValue {
  identity: SecurityIdentity | null;
  setIdentity(data: SecurityIdentity): void;
}
The way SecurityProvider is supposed to be used is, you mount it as a parent of the component that’s doing actual authentication in your application. Then, once you’ve logged in and obtained user information, you use the setIdentity method to set the identity information. That way, the rest of the application becomes immediately aware of the identity/user information and will rerender accordingly.
An example of this can be found on our GitHub, in the app-plugin-security-cognito 
Performing Authorization
We often need to show or hide parts of the UI depending on user’s permissions. Here’s an example implementation:
import React from "react";
import { useSecurity } from "@webiny/app-security";

export default () => {
  const { identity } = useSecurity();
  const permission = identity.getPermission("recipe");

  if (!permission) {
    return null;
  }

  return <div>Your recipe!</div>;
};
Conclusion
React applications load user permissions from the API, meaning they share the same permission objects. Handling of login is the responsibility of each individual React application and can be implemented in a number of ways, depending on your project requirements.
The only requirement from the Webiny API is that you provide the necessary plugins to authenticate your JWT and load identity’s permissions.